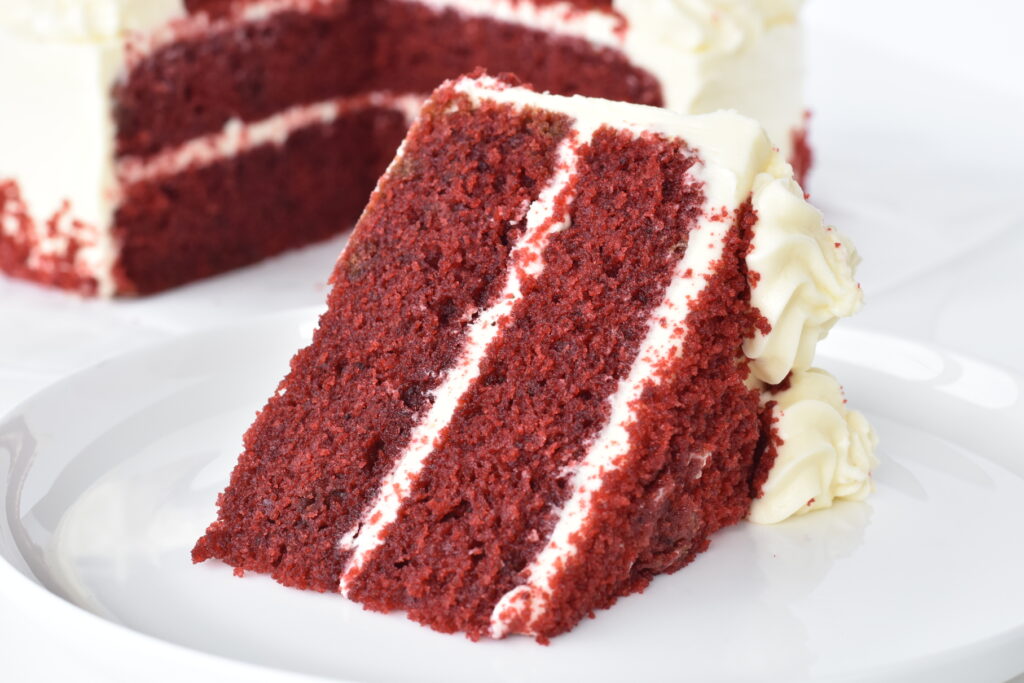
This soft, rich and moist cake is my absolute favourite special-occasion cake. It looks impressive but is ridiculously simple. All you need to do is whisk the wet and dry ingredients together!
I top this cake with a smooth cream cheese frosting and decorate the top and sides with crumbled cake offcuts. It always impresses and feeds a fair crowd. Enjoy!
What is Red Velvet Cake?
Traditionally, red velvet cake is red due to a chemical reaction between cocoa powder and other ingredients.
Cocoa powder contains natural acids. When combined with baking soda and an alkaline ingredient like buttermilk, it creates a chemical reaction that helps to leaven the cake and also gives it a subtle red colour.
Another chemical reaction that takes place in red velvet cake is the reaction between cocoa powder and vinegar. Cocoa powder is acidic and vinegar is acidic too, when they are mixed together they create a reaction which also helps to intensify the red colour of the cake.
In modern recipes, the use of red food colouring in the recipe can also contribute to the overall red colour of the cake.
Ingredients
- Plain / all-purpose flour
- Corn starch / cornflour: adds softness to the cake by imitating high-quality cake flour.
- Unsweetened cocoa powder: I use Hershey's (US) or Nestle (AUS/UK) brand. Do NOT use hot cocoa powder or raw 'cacao powder.'
- Baking soda / bicarbonate of soda: NOT baking powder.
- Salt
- Canola oil (or any other flavourless vegetable or cooking oil): note that using strongly flavoured oils such as olive or avocado will change the flavour of the cake.
- Unsalted butter, melted and cooled slightly: the combination of oil and butter produces a delicious, moist cake. If using salted butter, halve the added salt.
- Caster / superfine sugar: you can also use regular white sugar, although your cake might be denser.
- Eggs
- White vinegar: or apple cider, brown vinegar in a pinch.
- Buttermilk (substitutes do not work well for this recipe)
- Vanilla essence OR vanilla extract
- Red liquid food colouring OR high-quality gel food colouring
Why is my cake dry, dense or sunken?
- You are measuring your dry ingredients incorrectly: to measure dry ingredients such as flour, measure spoonfuls of flour into a measuring cup until it is heaped (do not pack down), then sweep off the excess with a flat-bladed butter knife.
- You overcooked the cakes: make sure to follow the recommended temperature guidelines and cooking times. These cakes do not tend to brown all across the surface so you must test your cakes with a skewer - it should be clean when inserted and removed from the centre of the cake, or just have a few moist clinging crumbs.
- Your baking soda is expired: check the expiry date of your baking soda. Expired baking soda is a VERY common cause of sunken or dense cakes.
Frequently Asked Questions
- Do I have to use buttermilk? In short, yes. Buttermilk substitutes (such as milk combined with vinegar or lemon juice) don't work as well in this recipe and will produce a drier cake. You should be able to find buttermilk at most major supermarkets (in the US, UK and AUS) or in specialty/organic food shops.
- What type of red food colouring should I use? I use a high quality liquid food colouring. This dissolves easily into the batter and produces a vivid red colour even after baking. If you only have access to gel food colour, make sure it is high-quality and start by only using 1 tablespoon (then add more as needed).
- Baking soda or baking powder? Red velvet cakes use baking SODA as a raising agent. This gives the cake its distinctive tangy flavour. In a pinch, you can substitute 1 teaspoon of baking soda with 3 teaspoon of baking powder for this recipe.
- Why does this recipe use both oil AND butter? Oil keeps the cake moist and soft, while butter gives the cake a beautiful rich flavour.
- Why is my batter runny? This batter is fairly thin (and that is okay!). Make sure your spring-form pan is tightly sealed so the batter does not leak out. Do NOT bake this cake sitting on top of a cookie tray or it will not bake evenly.

Serving Suggestions
Here are a few suggestions for what to serve with red velvet cake:
- Whipped Cream: A dollop of whipped cream or whipped cream cheese frosting can add a light and fluffy contrast to the rich and moist cake.
- Berries: Fresh berries such as raspberries, strawberries, or blueberries can add a pop of color and a burst of flavor to the cake. They can be used as a topping or mixed into the frosting.
- Ice Cream: A scoop of vanilla or chocolate ice cream can add a creamy texture and coolness to the cake, making it a perfect pairing for a warm summer day.
- Chocolate Sauce: A drizzle of chocolate sauce or ganache can add a decadent richness to the cake and complement the chocolate flavor in the cake.
- Caramel Sauce: A drizzle of caramel sauce can add a touch of sweetness and a hint of saltiness to the cake, making it a perfect pairing for those with a sweet tooth.
You can also make red velvet cupcakes using my recipe here.

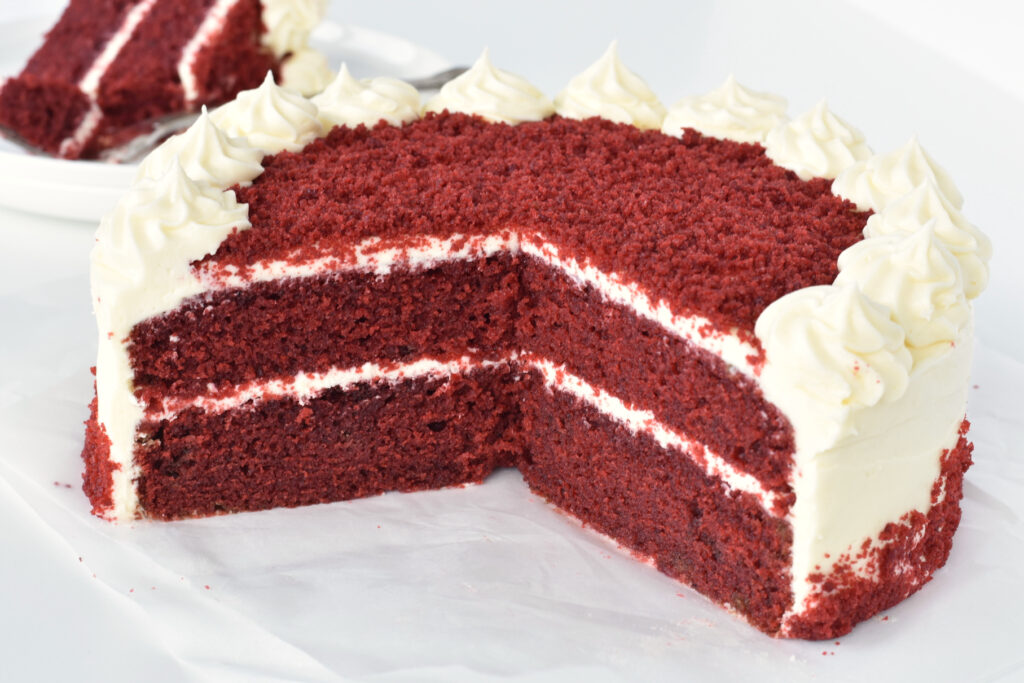
Red Velvet Cake with Cream Cheese Frosting
This rich and vibrant red velvet cake is soft, moist and frosted in a thick layer of cream cheese frosting. This cake is surprisingly simple to make as well! It's a simple as stirring together the wet and dry ingredients.
Ingredients
For the Red Velvet Cakes
- 2 ¼ (338 g) cups plain / all-purpose flour
- ¼ cup (35 g) corn starch / cornflour
- 2 tablespoon (16 g) unsweetened cocoa powder
- 1 teaspoon (5 g) baking soda / bicarbonate of soda
- ½ teaspoon (3 g) salt
- 1 cup (250 mL) canola oil (or any other flavourless vegetable or cooking oil)
- 125g (½ cup) unsalted butter, melted and cooled slightly
- 1 ½ (360 g) cups caster / superfine sugar
- 2 large eggs
- 1 teaspoon (5 mL) white vinegar
- 1 cup (250 mL) buttermilk -- substitutes do not work well for this recipe
- 2 teaspoon (10 g) vanilla extract
- 2 tablespoon (40 mL) red liquid food colouring OR 1 tablespoon (10 g) high-quality gel food colouring
For the Cream Cheese Frosting
- 125 g (½ cup) unsalted butter, at room temperature
- 250 g (8.8 oz / 1 cup) block of cream cheese, at room temperature
- 4 cups (560 g) icing / powdered sugar
- 2 tablespoon (40 mL) lemon juice
- 1 teaspoon (5 g) vanilla extract
Instructions
For the Red Velvet Cakes
- Preheat the oven to 160°C/320°F (fan-forced/convection) or 180°C/355°F (standard). Grease and line TWO pans measuring 20 cm (8 inch) with baking paper.
- In a large mixing bowl, sift together the flour, corn starch, cocoa powder, baking soda and salt. Whisk until well combined.
- In a separate large bowl, whisk together the oil and the cooled butter until well combined. Add sugar, eggs, vinegar, buttermilk, vanilla and food colouring. Whisk until well combined.
- Pour the wet ingredients into the dry ingredients and whisk until combined (a few lumps are okay - don't overbeat).
- Evenly distribute the batter between the two prepared tins. Bake for 35-40 minutes or until lightly browned around the edges and a skewer inserted in the centre of the cakes comes out clean.
- Allow to cool for 10 minutes in the tins before transferring to a wire rack to cool completely.
For the Cream Cheese Frosting
- In the large bowl of an electric mixer (or using a hand mixer), beat together the butter and cream cheese until thick, pale and creamy (about 3-4 mins).
- Add the icing sugar, lemon juice, and vanilla, and beat until very pale and thick (about 5 minutes). Add more icing sugar or lemon juice to adjust consistency as needed.
Assembly
- If the cakes are very domed, level the top of each cake with a serrated knife.
- Place one cake on a large, flat plate. Top with one quarter of the cream cheese frosting and spread the frosting evenly over the cake.
- Flip the second cake upside down onto the first. Top with half of the remaining frosting, spreading the frosting from the centre towards the edges of the cake.
- Use the remaining frosting to cover the sides of the cake. Use a flat (palette) knife to smooth out the top and sides.
- Crumble up the offcuts of the cake and sprinkle along the sides and top of the cake, if desired.
- Refrigerate for 1-2 hours or until frosting is firm. Keep the cake refrigerated until ready to serve.
Notes
Storage
- Keep the frosted cake covered in the refrigerator for up to 4 days.
- To freeze the unfrosted cakes: wrap cooked cakes individually in clingfilm and place in zip-loc or freezer bags. Keep frozen for up to 6 months. Defrost for 6 hours or overnight at room temperature and frost as normal.
Substitutions & Tips
- Baking soda vs baking powder: baking soda is more potent than baking powder and has a somewhat tangy taste. Baking soda will help give red velvet cake its essential slightly tangy flavour. In a pinch, you can substitute 1 teaspoon of baking soda with 3 teaspoon baking powder.
- Canola oil: use any flavourless vegetable or cooking oil. Do not use coconut oil, olive oil, avocado oil, or any other strongly flavoured oils.
- Buttermilk: most recipes allow you to substitute buttermilk for a combo of milk and vinegar. However I do NOT recommend substituting buttermilk for milk in this recipe. It is an essential ingredient for a rich and tangy red velvet cake.
- White vinegar: substitute with an equal amount of apple cider vinegar, brown vinegar, malt vinegar, etc. Do NOT use balsamic vinegar.
- Baking your cakes evenly: my oven fits two cake tins on one rack. I recommend baking both tins in one rack and rotating at around the 25 minute mark. You can also bake one cake after the other to ensure very even cooking.
Nutrition Information:
Serving Size: 1/12th of the Cake with FrostingAmount Per Serving: Calories: 775Total Fat: 44.1gSaturated Fat: 16.5gTrans Fat: 0gUnsaturated Fat: 7.8gCholesterol: 97.5mgSodium: 336.4mgCarbohydrates: 91.9gFiber: 1gSugar: 69.4gProtein: 5.7g


Carla says
Hi there, would this recipe also work as cupcakes?
Chloe says
Hi Carla, I haven't yet tried this recipe as cupcakes, although I can't see why not 🙂 Make sure to only fill the cupcake cases half way. I would start with 15-20 mins baking time. Let me know how it goes!
ML Neo says
Hi Chloe, my oven can only fit one 8-inch pan and bake one at a time. Can this cake batter bake one at a time i.e. bake half of the batter first, keep the second batter in the fridge and then bake the second half of the batter?
If I use this batter recipe as a one WHOLE 8-inch cake, what would be the baking time using the same baking temperature please?
What adjustments are needed for the frosting for one WHOLE 8-inch cake i.e. frosting on just the top and the sides?
Looking forward to your advice. Thank you in advance.
Chloe says
Hello! In answer to your first question, you can absolutely bake the cakes one after the other if your oven isn't large enough to fit both. I would just leave the second cake tin full of batter on the bench (no need to refrigerate it).
If you bake all of the batter in one tin, I would be concerned that the cake will collapse. It's a very thin batter and I'm not sure whether it will hold it's own weight if baked all at once. I would instead recommend reducing the batter quantity by half and just baking a shorter cake. Either way, you can definitely reduce the frosting recipe by half and that would be plenty for covering just the top and sides of the cake!
Hope that makes sense and enjoy 🙂 x Chloe.
Diana Frappier says
Would this recipe work in a 9/13 Pyrex to make little mini cakes.
Chloe says
Hi Diana, yes you should be able to bake it in the glass dish, but the baking time may be longer because glass takes longer to absorb heat.